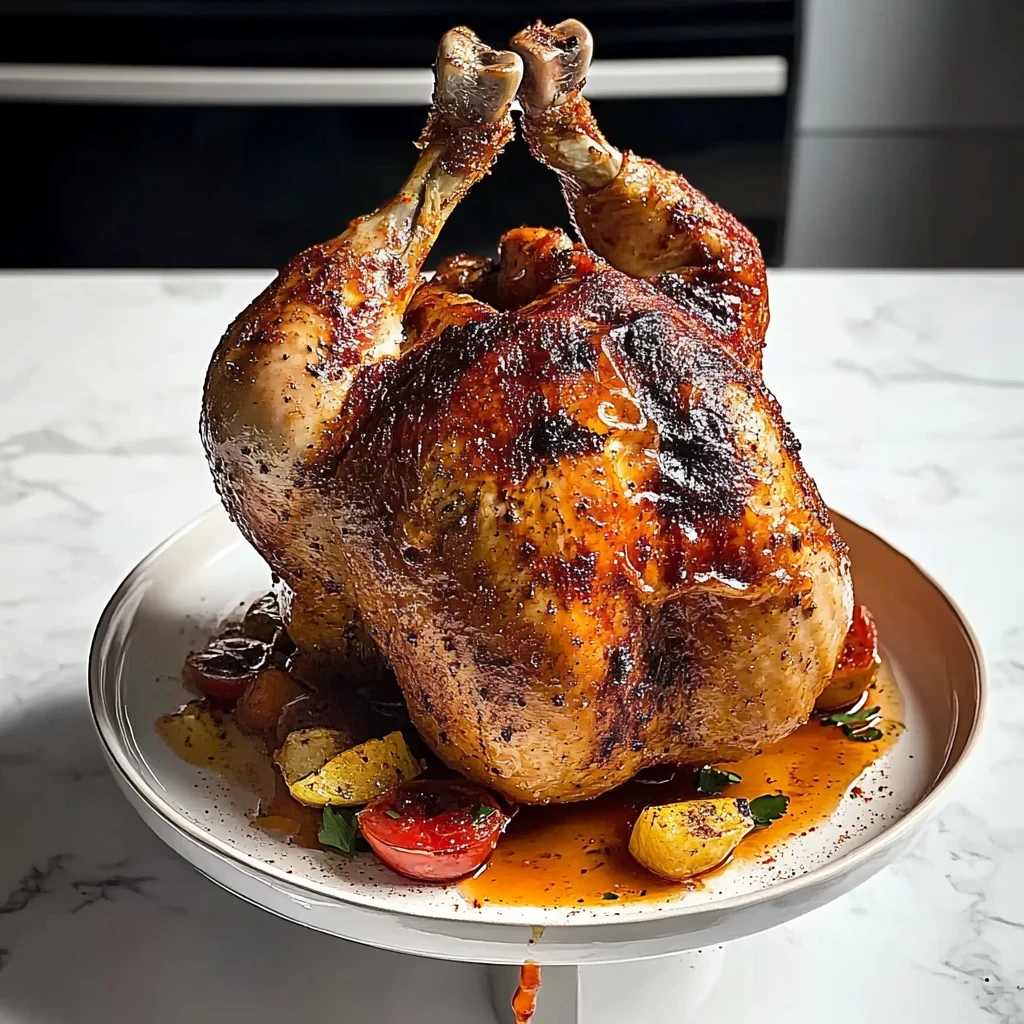
Imagine the sizzle of juicy chicken, perfectly seasoned and infused with the rich, hoppy aroma of your favorite beer wafting through the air. This is not just any chicken; this is beer can chicken, a showstopper that turns your backyard into a flavor-packed fiesta and ignites your taste buds with every bite.

Growing up, summer weekends meant family gatherings where the grill was our trusty sidekick and beer can chicken was the hero of the feast. The laughter, the tantalizing smells, and the anticipation of that first delicious bite created memories I cherish. Whether it’s a backyard barbecue or a casual get-together with friends, this dish guarantees to impress everyone around the table while filling hearts and bellies with joy!
Why You'll Love This Recipe
- This delightful beer can chicken is a cinch to prepare, leaving you more time for fun
- The seasoning blend creates an explosion of flavor that will have your taste buds dancing
- Its golden-brown skin and succulent meat make for a show-stopping centerpiece at any gathering
- Not just for the grill, this recipe adapts beautifully to your oven or stovetop too
I remember the laughter and smiles around the table when I served beer can chicken for my family’s summer barbecue.
Essential Ingredients
Here’s what you’ll need to make this delicious beer can chicken:
-
Whole Chicken: A 4-5 pound chicken works best for even cooking and flavor absorption.
-
Olive Oil: Use extra virgin olive oil for a richer taste and better adherence of spices.
-
Paprika: Choose smoked paprika for a deeper flavor, but regular works well too.
-
Garlic Powder: This adds a robust garlic flavor without the hassle of fresh garlic preparation.
-
Onion Powder: Ideal for enhancing the overall savory profile of your chicken.
-
Salt: Adjust to your taste, ensuring the chicken is well-seasoned for maximum flavor.
-
Black Pepper: Freshly ground pepper enhances the seasoning’s freshness and depth.
-
Beer: Pick a lager or ale you enjoy drinking; it contributes unique flavors to the chicken.
The full ingredients list, including measurements, is provided in the recipe card directly below.
Let’s Make it together
Preheat the grill: Begin your beer can chicken adventure by preheating your grill to medium heat, which is around 350°F or 175°C. This step is crucial because a well-heated grill ensures that your chicken cooks evenly and develops that beautiful golden skin. As the grill warms up, you’ll hear the comforting sound of the flames crackling, setting the stage for a delicious meal ahead.
Create the seasoning rub: While waiting for the grill to reach the perfect temperature, grab a small bowl and mix together 2 tablespoons of olive oil, 1 tablespoon of paprika (smoked or regular), 1 tablespoon of garlic powder, 1 tablespoon of onion powder, and a teaspoon each of salt and black pepper. This aromatic blend will create a fragrant seasoning rub that elevates the chicken’s flavor profile. Let your senses guide you as you stir; inhale the earthy aroma of paprika and garlic wafting through your kitchen, promising a savory experience.
Prepare the chicken: Now it’s time to prepare your star ingredient: the whole chicken. First, pat it dry thoroughly with paper towels; this is essential for achieving that crispy skin. Once dry, take your delightful seasoning rub and coat every inch of the chicken with it, including under the skin if you’re feeling adventurous. The tactile sensation of rubbing in those spices adds an extra layer of love to your dish—trust me, it’s worth it!
Open the beer can: Next comes one of the most fun parts: opening your can of beer! Choose a lager or ale that you enjoy drinking. After popping it open, take a few sips (or pour some out if you prefer) to make it easier to insert into the chicken later on. The scent of hops will fill the air; it’s just another hint at how flavorful this dish will become.
Insert the beer can: With your beer can ready, carefully insert it into the cavity of the seasoned chicken. Ensure it stands upright—this is where all that moisture and flavor will infuse into your bird as it cooks. If you have a beer can holder, now’s the time to use it; otherwise, simply place your chicken on its back on the grill grate.
Grill to perfection: Close that grill lid and let magic happen! Cook your beer can chicken for about 90 minutes or until its internal temperature reaches 165°F (75°C) in the thickest part of the thigh. As it cooks, savor the intoxicating aroma wafting from your grill—a tantalizing mix of spices and beer fills the air while that beautiful golden crust forms on your chicken.
Follow these steps closely for a successful beer can chicken that’s sure to delight everyone at your table!
Chef's Helpful Tips
- Make sure to pat the chicken dry before applying the seasoning; this helps the rub adhere better and enhances flavor
- Use a thermometer to check for doneness; the internal temperature should reach 165°F for perfectly cooked chicken
- Let the chicken rest after grilling; this allows juices to redistribute, ensuring moist and flavorful meat
Perfecting the Cooking Process

For the best results when making beer can chicken, start by preheating your grill to medium heat at 350°F (175°C). While the grill heats up, prepare your seasoning and rub it on the chicken. This approach ensures that the chicken cooks evenly and absorbs maximum flavor during grilling.
Beer Can Chicken: A Flavorful Delight
Beer can chicken is a unique and delicious way to grill a whole chicken, infusing it with moisture and flavor. Using a whole chicken weighing about 4-5 pounds, you’ll create a crispy exterior while keeping the meat juicy inside. The combination of olive oil, smoked paprika, garlic powder, onion powder, salt, and black pepper makes for an irresistible seasoning rub that elevates this dish.
Ingredients You’ll Need
To make beer can chicken, gather the following ingredients. You will need one whole chicken weighing about 4-5 pounds. For seasoning, have two tablespoons of olive oil for coating, one tablespoon each of paprika (smoked or regular), garlic powder, onion powder, one teaspoon of salt to taste, and one teaspoon of black pepper to taste. Finally, choose a can of beer—lager or ale works best.
Step-by-Step Instructions
Start by preheating your grill to medium heat at around 350°F (175°C). In a small bowl, combine two tablespoons of olive oil with one tablespoon each of paprika, garlic powder, onion powder, salt, and black pepper to create a flavorful rub. Pat the chicken dry with paper towels before generously applying this seasoning mixture all over the bird and under the skin for enhanced flavor.
Next, open a can of your chosen beer. It’s best to take a few sips from the can or pour some out to make it easier to fit into the cavity of the chicken. Insert the beer can into the cavity of the seasoned chicken so that it stands upright. If you have a beer can holder, use it for added stability while grilling.
Place the chicken on your preheated grill and close the lid. Cook for approximately 1.5 hours or until the internal temperature reaches 165°F (75°C) in the thickest part of the thigh. Once cooked through, remove the chicken from the grill and allow it to rest for about 10-15 minutes before carefully removing the beer can.
Finally, carve your perfectly grilled beer can chicken and serve it warm for an impressive meal that is sure to impress family and friends alike!
Add Your Touch
Feel free to customize your beer can chicken by experimenting with different seasonings. Try adding a tablespoon of brown sugar for sweetness or substituting the paprika with chili powder for a spicy kick. You can also use your favorite craft beer to enhance the flavor profile.
Storing & Reheating
To store leftover beer can chicken, place it in an airtight container in the refrigerator for up to three days. When reheating, preheat your oven to 350°F (175°C) and warm the chicken for about 20 minutes, or until it reaches an internal temperature of 165°F (75°C).FAQ
What is beer can chicken?
Beer can chicken is a grilling method using a whole chicken cooked upright on a beer can.
How long does it take to cook beer can chicken?
The total cooking time for beer can chicken is approximately 90 minutes.
What type of beer is best for beer can chicken?
A lager or ale of your choice works best for flavor and moisture in beer can chicken.
beer can chicken
Ingredients
Method
- Preheat the grill to medium heat (about 350°F or 175°C).
- In a small bowl, mix together the olive oil, paprika, garlic powder, onion powder, salt, and black pepper to create a seasoning rub.
- Pat the chicken dry with paper towels and rub the seasoning mixture all over the chicken, including under the skin for more flavor.
- Open the can of beer and take a few sips (or pour some out) to make it easier to fit into the chicken.
- Insert the beer can into the cavity of the chicken, ensuring it stands upright.
- Place the chicken on the grill, using a beer can holder if available, and close the lid.
- Cook the chicken for about 1.5 hours, or until the internal temperature reaches 165°F (75°C) in the thickest part of the thigh.
- Remove the chicken from the grill and let it rest for 10-15 minutes before carefully removing the beer can.
- Carve and serve the chicken warm.